ASP.Net Core Web API using code-first entity framework

asp.net core web api tutorial for beginners, asp.net core web api authentication,asp.net core web api best practices,asp.net core 2.0 web api tutorial,asp.net core tutorial,asp.net core web api routing,asp.net web api,create a web api with asp.net core and visual studio code,how to create web api in asp.net c#,asp net core mvc and web api in same project,asp.net core web api architecture,asp.net core 2.0 sample application,asp.net core 2.2 rest api tutorial 1,asp.net core api code first,Migration of Models,asp.net core api crud operation,asp.net core 2.2 api controller,settings for asp.net core web api


In this article, I will tell you what type of settings required for an ASP.NET core API Solution. Here I will use Swagger for running the APIs. Also, I will tell the required configuration for Swagger in ASP.NET Core Web API. ASP.NET Core support only the code-first entity framework but it doesn't support database-first and model-first entity framework.  Follow the steps:

Step:1
Create a Database in SQL Server. Here I created the "DB_Profile" database. Here we only create a database we will not add tables. For adding tables we will use code-first in  ASP.NET Core Web API. 

Step:2
Create ASP.NET Core API Project. 
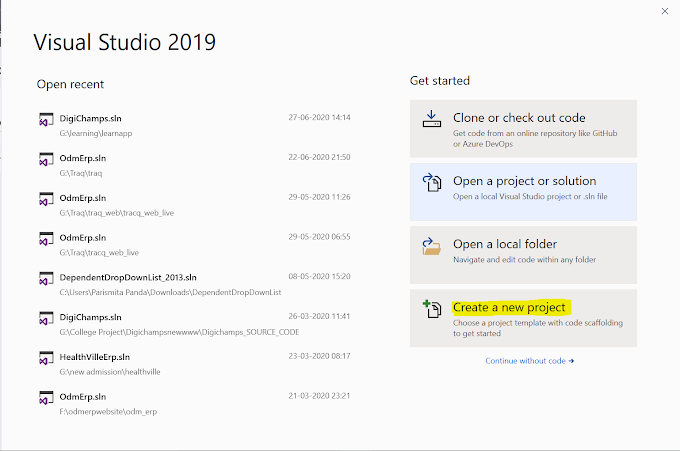
Open visual studio 2019 and select Create a new project.
asp.net core web api tutorial for beginners, asp.net core web api authentication,asp.net core web api best practices,asp.net core 2.0 web api tutorial,asp.net core tutorial,asp.net core web api routing,asp.net web api,create a web api with asp.net core and visual studio code,how to create web api in asp.net c#,asp net core mvc and web api in same project,asp.net core web api architecture,asp.net core 2.0 sample application,asp.net core 2.2 rest api tutorial 1,asp.net core api code first,Migration of Models,asp.net core api crud operation,asp.net core 2.2 api controller,settings for asp.net core web api

Then select ASP.NET Core Web Application. Click on the Next button.
asp.net core web api tutorial for beginners, asp.net core web api authentication,asp.net core web api best practices,asp.net core 2.0 web api tutorial,asp.net core tutorial,asp.net core web api routing,asp.net web api,create a web api with asp.net core and visual studio code,how to create web api in asp.net c#,asp net core mvc and web api in same project,asp.net core web api architecture,asp.net core 2.0 sample application,asp.net core 2.2 rest api tutorial 1,asp.net core api code first,Migration of Models,asp.net core api crud operation,asp.net core 2.2 api controller,settings for asp.net core web api
Enter your project Name. Click on the Create button.

asp.net core web api tutorial for beginners, asp.net core web api authentication,asp.net core web api best practices,asp.net core 2.0 web api tutorial,asp.net core tutorial,asp.net core web api routing,asp.net web api,create a web api with asp.net core and visual studio code,how to create web api in asp.net c#,asp net core mvc and web api in same project,asp.net core web api architecture,asp.net core 2.0 sample application,asp.net core 2.2 rest api tutorial 1,asp.net core api code first,Migration of Models,asp.net core api crud operation,asp.net core 2.2 api controller,settings for asp.net core web api


Select API. Click on the Create button.


asp.net core web api tutorial for beginners, asp.net core web api authentication,asp.net core web api best practices,asp.net core 2.0 web api tutorial,asp.net core tutorial,asp.net core web api routing,asp.net web api,create a web api with asp.net core and visual studio code,how to create web api in asp.net c#,asp net core mvc and web api in same project,asp.net core web api architecture,asp.net core 2.0 sample application,asp.net core 2.2 rest api tutorial 1,asp.net core api code first,Migration of Models,asp.net core api crud operation,asp.net core 2.2 api controller,settings for asp.net core web api


Then your project will open. 

Step:3
Now we will do code-first entity framework setting. Create a model class "Profile.cs" file inside the Model. This model class is representing the table structure.  Follow the code:


using System;
using System.Collections.Generic;
using System.ComponentModel.DataAnnotations;
using System.ComponentModel.DataAnnotations.Schema;
using System.Linq;
using System.Threading.Tasks;

namespace ProfileWebApi.Model
{
[Table(name:"Profile")]
public class Profile
{
[Key]
public long ID { get; set; }
[Column(TypeName = "varchar(500)")]
[Required]
public string Customer_Name { get; set; }
[Column(TypeName = "varchar(500)")]
[Required]
public string Mobile { get; set; }
[Column(TypeName = "varchar(MAX)")]
[Required]
public string Email { get; set; }
[Column(TypeName = "varchar(500)")]
[Required]
public string Password { get; set; }
[Column(TypeName = "datetime")]
[Required]
public DateTime InsertedDate { get; set; }
[Column(TypeName = "datetime")]
[Required]
public DateTime ModifiedDate { get; set; }
[Column(TypeName = "bigint")]
public long InsertedId { get; set; }
[Column(TypeName = "bigint")]
public long ModifiedId { get; set; }
[Column(TypeName = "bit")]
public bool Active { get; set; }
[Column(TypeName = "varchar(50)")]
public string Status { get; set; }
[Column(TypeName = "bit")]
public bool IsAvailable { get; set; }

}
}

Step:4
Create a context class "ApplicationDbContext.cs" in Model Folder. Because context class manages the interaction between your classes and your database. Follow the below code:


using Microsoft.EntityFrameworkCore;
using System;
using System.Collections.Generic;
using System.Linq;
using System.Threading.Tasks;

namespace ProfileWebApi.Model
{
public class ApplicationDbContext : DbContext
{
public ApplicationDbContext(DbContextOptions<ApplicationDbContext> options)
: base(options) { }


protected override void OnConfiguring(DbContextOptionsBuilder optionsBuilder)
{
optionsBuilder.EnableSensitiveDataLogging();
// ...
}


public DbSet<Profile> profiles { get; set; }
}
}

Step:5
Write your Database connection-string in the "appsettings.json" file. Follow the code:

{
"Logging": {
"LogLevel": {
"Default": "Warning"
}
},
"ConnectionStrings": {
"DevConnection": "Server=(local)\\SQLEXPRESS;Database=DB_Profile;Trusted_Connection=True;
MultipleActiveResultSets=True",
  },
"AllowedHosts": "*"
}
Here Server is your SQL Server Name. and Database is your SQL Server database name. if you are using server-side authentication then you have to give username and password. But for windows authentication only use "Trusted_Connection=True;". Here no need for username and password.
For Server-Side Authentication:
"DevConnection": "Server=(local)\\SQLEXPRESS;Database=DB_Profile;User name=sa;Password=1234;
MultipleActiveResultSets=True",
For Windows Authentication:

"DevConnection": "Server=(local)\\SQLEXPRESS;Database=DB_Profile;Trusted_Connection=True;
MultipleActiveResultSets=True",

Step:6
Setup code inside "ConfigureServices" method in "Startup.cs"  for to connect context class file with connectionstring. Follow the code:

  services.AddDbContext<ApplicationDbContext>(options =>
            {
                options.UseSqlServer(Configuration.GetConnectionString("DevConnection"));
            });


Step:7
Now we will do migration and update the database for managing tables. Follow the code:

  • Open Tools => NuGet Package Manager => Package Manager Console
asp.net core web api tutorial for beginners, asp.net core web api authentication,asp.net core web api best practices,asp.net core 2.0 web api tutorial,asp.net core tutorial,asp.net core web api routing,asp.net web api,create a web api with asp.net core and visual studio code,how to create web api in asp.net c#,asp net core mvc and web api in same project,asp.net core web api architecture,asp.net core 2.0 sample application,asp.net core 2.2 rest api tutorial 1,asp.net core api code first,Migration of Models,asp.net core api crud operation,asp.net core 2.2 api controller,settings for asp.net core web api

  • Then Write this command and execute for migration:
      add-migration MyFirstMigration
asp.net core web api tutorial for beginners, asp.net core web api authentication,asp.net core web api best practices,asp.net core 2.0 web api tutorial,asp.net core tutorial,asp.net core web api routing,asp.net web api,create a web api with asp.net core and visual studio code,how to create web api in asp.net c#,asp net core mvc and web api in same project,asp.net core web api architecture,asp.net core 2.0 sample application,asp.net core 2.2 rest api tutorial 1,asp.net core api code first,Migration of Models,asp.net core api crud operation,asp.net core 2.2 api controller,settings for asp.net core web api

  • Then execute the command for update database:
        update-database
asp.net core web api tutorial for beginners, asp.net core web api authentication,asp.net core web api best practices,asp.net core 2.0 web api tutorial,asp.net core tutorial,asp.net core web api routing,asp.net web api,create a web api with asp.net core and visual studio code,how to create web api in asp.net c#,asp net core mvc and web api in same project,asp.net core web api architecture,asp.net core 2.0 sample application,asp.net core 2.2 rest api tutorial 1,asp.net core api code first,Migration of Models,asp.net core api crud operation,asp.net core 2.2 api controller,settings for asp.net core web api

  • See "Migrations" folder is created in your project.

asp.net core web api tutorial for beginners, asp.net core web api authentication,asp.net core web api best practices,asp.net core 2.0 web api tutorial,asp.net core tutorial,asp.net core web api routing,asp.net web api,create a web api with asp.net core and visual studio code,how to create web api in asp.net c#,asp net core mvc and web api in same project,asp.net core web api architecture,asp.net core 2.0 sample application,asp.net core 2.2 rest api tutorial 1,asp.net core api code first,Migration of Models,asp.net core api crud operation,asp.net core 2.2 api controller,settings for asp.net core web api

Step-8
For setting swagger in your project.
  • Install Swashbuckle.AspNetCore.SwaggerUI and Swashbuckle.AspNetCore.SwaggerGen.
asp.net core web api tutorial for beginners, asp.net core web api authentication,asp.net core web api best practices,asp.net core 2.0 web api tutorial,asp.net core tutorial,asp.net core web api routing,asp.net web api,create a web api with asp.net core and visual studio code,how to create web api in asp.net c#,asp net core mvc and web api in same project,asp.net core web api architecture,asp.net core 2.0 sample application,asp.net core 2.2 rest api tutorial 1,asp.net core api code first,Migration of Models,asp.net core api crud operation,asp.net core 2.2 api controller,settings for asp.net core web api

asp.net core web api tutorial for beginners, asp.net core web api authentication,asp.net core web api best practices,asp.net core 2.0 web api tutorial,asp.net core tutorial,asp.net core web api routing,asp.net web api,create a web api with asp.net core and visual studio code,how to create web api in asp.net c#,asp net core mvc and web api in same project,asp.net core web api architecture,asp.net core 2.0 sample application,asp.net core 2.2 rest api tutorial 1,asp.net core api code first,Migration of Models,asp.net core api crud operation,asp.net core 2.2 api controller,settings for asp.net core web api


  • After installation completed, Write the following code in "Startup.cs" for swagger settings.
inside "ConfigureServices" method:

 services.AddSwaggerGen(c =>
            {
                c.SwaggerDoc("v2", new OpenApiInfo { Title = "My API", Version = "v2" });
            });

and write the following code in the "Configure" method.

 app.UseSwagger();
            app.UseSwaggerUI(c =>
            {
                c.SwaggerEndpoint("/swagger/v2/swagger.json", "My API V1");
            });

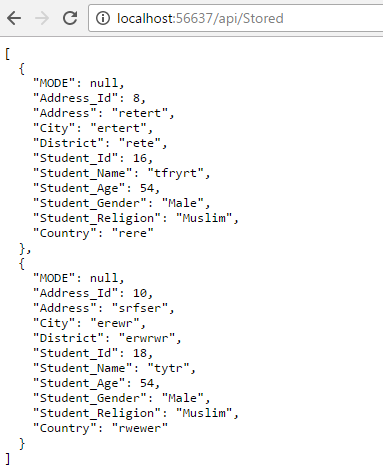
Now you are ready to write your web API in ASP.NET Core.

CRUD Operation Reference Link:


Video For Reference:


That's it. I hope you have found this article helpful. Do let me know via comments and likes.

Post a Comment

1 Comments

  1. Thank you for sharing this article,
    Find the best Dot net core web API tutorial now. Get high-quality notes and lectures from top experts with Technology Crowds. This Dot net core web API tutorial helps you to understand all the theories clearly. They give a lecture from a basic level.

    ReplyDelete